How to bridge your Motorola 2210-02-1ATT (AT&T U-verse IP-DSL)
There is a lot of confusion over AT&T’s new Internet-only U-verse plans and their associated hardware. While U-verse was originally fiber optic Internet (either Fiber To The Home or Fiber To The Node with VDSL to the home), AT&T has now rolled out an IP-based ADSL2/2+ product under the U-verse name as well. This is generally indicated on AT&T’s U-verse availability page with only Internet being available, not TV or Phone. This new U-verse IP-DSL is similar to traditional ADSL, but it does not use ATM or PPPoE for the connection.
AT&T has supplied several different modems to U-verse IP-DSL customers, including the 2Wire 2701HGV-B, Motorola 2210-02-1ATT, and the Motorola NVG510. The 2701HGV-B and NVG510 have Wi-Fi routers builtin, whereas the 2210-02-1ATT is wired-only. If you already have a decent LAN with Wi-Fi, then the builtin NAT routers on these devices are unnecessary and probably unwanted. Using the default NAT router settings of any of these modem/routers along with your own router will result in a double NAT situation. Instead of the desired configuration where your router’s WAN interface gets the public Internet IP address and your LAN uses a private range of IPs, you end up with the public IP on the modem’s builtin router, one private IP range on the LAN side of the modem’s router and the WAN side of your router, and a second private IP range on the LAN side of your router. This extra translation in the middle complicates connections from the Internet to your LAN devices.
The solution is to disable the modem’s builtin router and pass the Internet connection directly to your router. In general there are two similar ways to achieve this which differ slightly in the technical details. In “bridging” the modem is configured as basically just a phone-to-Ethernet adapter, and your own router actually acts as the endpoint of the DSL connection. This generally means running a PPPoE client on the router (i.e. entering your DSL login information on your router). In “IP passthrough” the modem acts as the PPPoE client and endpoint of the DSL connection, and simply hands off plain old Ethernet Internet to the attached device (similar to how a standard cable modem works). A modern router may be faster than the modem’s hardware, so it’s possible the router in bridged mode could do a better job of running the PPPoE client. However, IP passthrough mode means all of the DSL-specific details are handled by the modem, and the router doesn’t require any special configuration.
With this new U-verse IP-DSL, 802.1X authentication is used in place of PPPoE. This means that existing routers’ PPPoE is of no use, as only devices containing AT&T’s certificate will properly authenticate with their system. At this time, there are no other devices that can act as an endpoint of the IP-DSL connection, so it’s technically impossible to use “bridged mode” with U-verse IP-DSL. However, “IP passthrough” will generally do the exact same thing that people are trying to achieve with bridged mode, and it’s very simple to configure this on the 2210-02-1ATT.
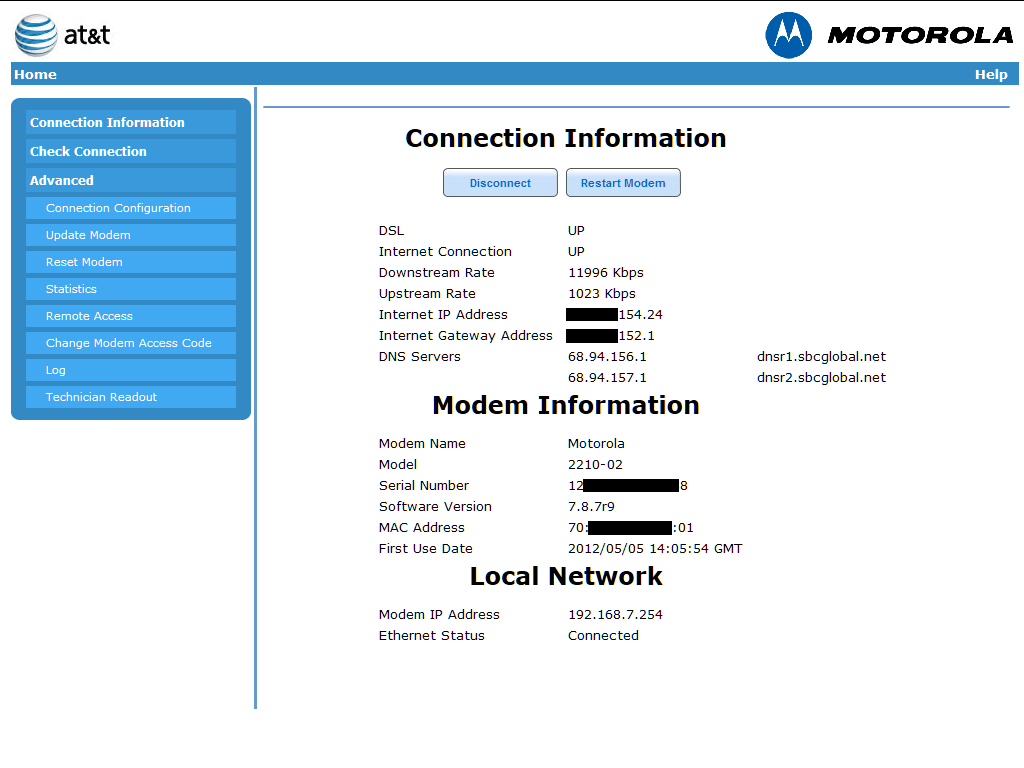
My 2210-02-1ATT came with software version 7.8.7r9. There may be other software versions out there (based on others’ comments) that have a different interface. The interface on mine is nearly identical to my old Siemens SpeedStream 4100, minus the PPPoE options. The default private IP of my 2210-02-1ATT is 192.168.7.254. If any of these details differ on your 2210, you’ll need to adjust accordingly. While changing settings on your modem, you may at times be required to enter the Access Code from the sticker on the modem.
- Connect your PC to the LAN side of your router and configure your router’s LAN settings. Frequently, broadband routers default to 192.168.0.1 or 192.168.1.1. Your PC should automatically get an IP in the same range as the router (e.g. 192.168.0.100 or 192.168.1.50). You can use any private IP range you wish for your LAN, except the 192.168.7.x range used by the 2210.
- Configure your router’s WAN interface to get its address via DHCP. This is usually the most basic option available for the WAN connection. Do not choose “PPPoE”, “PPTP”, “L2TP”, or anything else that requires additional configuration. Simple DHCP is all you want.
- Connect your router’s WAN port to the Ethernet port on the 2210. If the 2210 is configured with its default settings, it should provide a 192.168.7.x address to the router’s WAN interface via DHCP. We’ll say it’s 192.168.7.55.
- In your PC’s browser, go to 192.168.7.254 to bring up the 2210’s settings. (Because the IP is outside your LAN’s range, the router should pass the request out to the modem, allowing you access to the modem through the router.) You should see some details about the Internet connection, such as your connection speed and IP address.

- In the menu on the left side, expand “Advanced” and click on “Connection Configuration” to access pretty much the only available options.

- At the bottom of the page, select the “Yes, use public IP address” option, then click “Save Changes”. You should be prompted to restart the modem for the changes to take effect.
- Once the modem has restarted, check the status of your router (see step 1). If it didn’t automatically get the public Internet IP address from the modem after the restart, you may need to renew the router’s IP or restart it as well.

Once the router is getting the public IP, you can forget the 2210 is even there. It’s basically just converting your phone line into an Ethernet Internet connection. If you need to forward ports or edit firewall rules, you should do so in your own router. I haven’t had a chance to do any extensive load testing yet, but I did verify that IPsec, PPTP, port-forwarding (manual and UPnP), and BitTorrent with DHT were working as expected in this configuration.
UPDATE: My 2210 came with firmware 7.8.7r9, as seen in the screenshots. During 2012, AT&T rolled out 7.8.7r27. This update included new 802.1x certificates, which are how the device authenticates to AT&T’s network. If you have an older device that wasn’t connected during the r27 rollout, it’s stuck with the old certs, so it’s not able to connect and download the updated firmware with the new certs. You can read more about the problem at http://thinkdiff.org/blg/?p=5. You can download the new r27 firmware from http://thinkdiff.org/blg/?p=47 (mirror). Once you have the .bin file, you can update your 2210 by going to http://192.168.7.254/uploadt.htm.